CAKE BAKING 101: (Part 2) Equipment & Utensils…. Choose wisely !
Baking is a Science ! Why not?! Unlike other forms of cooking it involves precise measurements of wet/dry ingredients and clear followed protocols to achieve perfection. You will find it helpful investing in quality equipment and utensils for your baking purposes. Here is a list of basic “must and recommended” haves in your kitchen.
(1) Mixers and Bowls

A simple whisk comes in handy when you need to mix and fluff your dry ingredients before sifting. Mixers are equipments used in making your cake batter. In my initial days of baking, I used an electric hand mixer. If you are not a frequent baker then it is the first recommended choice… It is a little tedious and sometimes messy having to hold and add the ingredients simultaneously- a technique you build with experience. This mixer comes with standard dual attachments which I use both for whipping and mixing. After a few years of routine baking I upgraded to a multipurpose Kitchen Aid Mixer which has now become a life saver – just requires attaching the paddle and setting your prefered speed.

The Kitchen Aid comes with three attachments specific for – mixing (paddle attachment) , whipping (whip attachment) and kneading (hook attachment).
 For mixing bowls use containers made with either glass/pyrex or metal. This metal bowl came with my Kitchen Aid mixer.
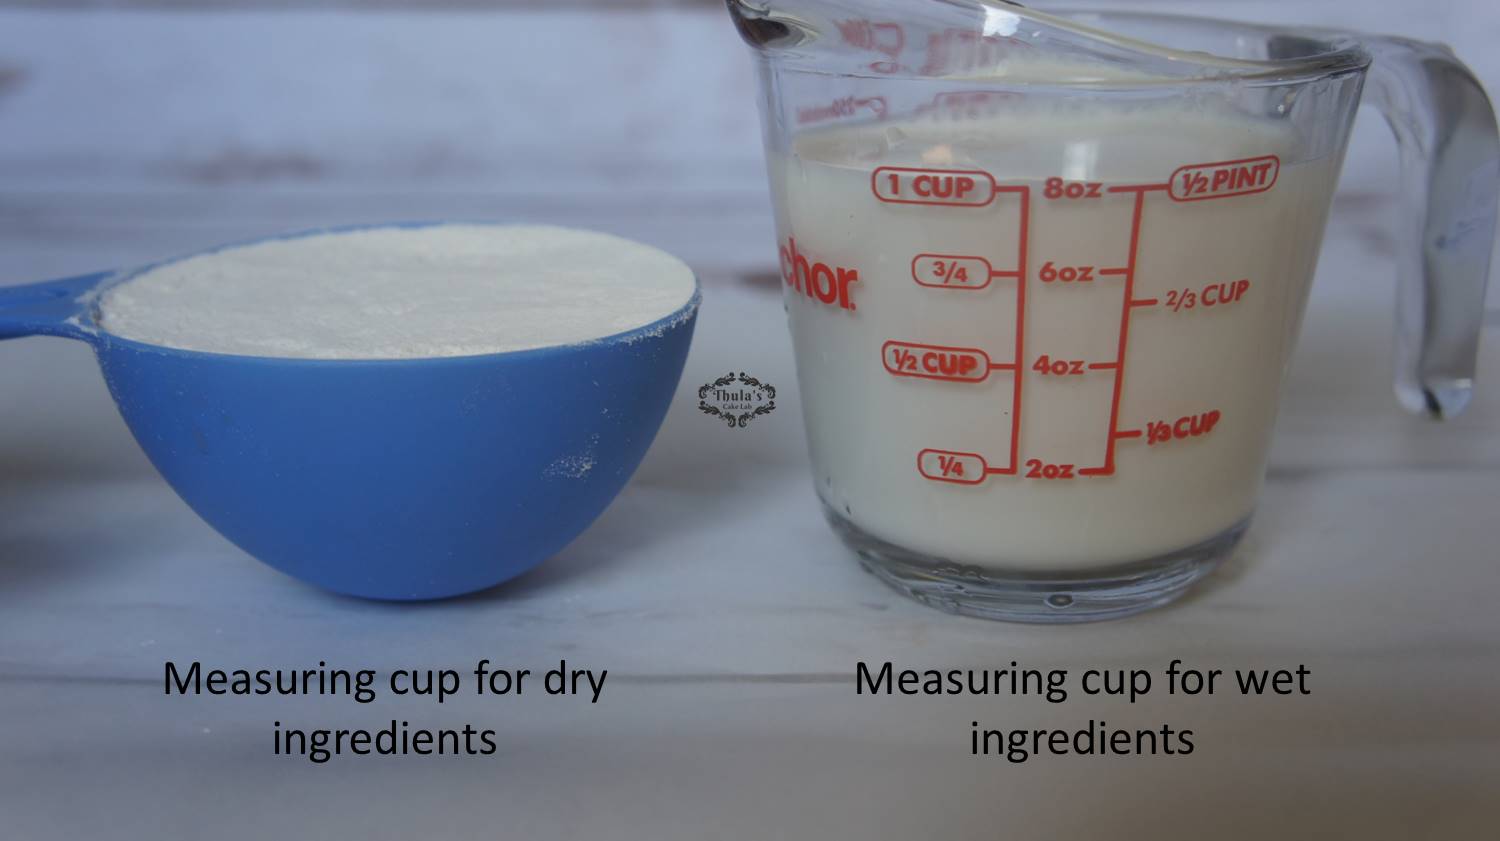
(2) Measuring Cups ,Measuring Spoons and Spatulas

Precise measurement is vital in baking. Always use the right measuring cup/spoon size. If a recipe calls for 1/2 cup then use a “half” cup and not “half of one” cup (makes sense?). Same applies to measuring spoons which are used universally for both liquid and dry ingredients. For cupcakes I use specific batter spoons which help with cutting short preparation time and yield in cupcakes that are similar in size. This is an optional buy as you can eyeball measurements too (pour batter until 1/3rd full).

For liquids 1/4 cup and more , I use a liquid specific measuring cups which are different from the ones used to measure dry ingredients.
(3) Weighing Scale

I use a mini kitchen digital weighing scale. It is easy to use and comes with a tare option (reset to zero). Reading is in grams/oz. Its small size makes it easy to clean and store.
(4) Sifter

Sifting is a three step process…. Good sifting ensures even distribution of dry ingredients in your mix while “aerating” the flour which in return helps with “even” baking- preventing any tunnels/cracks. It helps achieve tender spongy cakes. I like using the hand sifter as it comes with an attached handle that helps to mix and sift simultaneously. Stay tuned as I have a detailed article on “sifting” coming up next !
(5) Oven
Ovens are the heart of a kitchen and workhorses of any bakery unit. There are three types of baking ovens- the “convection” and “conduction” oven, both powered by gas or electricity… and now the recent addition- microwave oven! I do not recommend microwave baking as it results in drier uneven baked cakes. If you are looking to use a dual microwave oven then try using the “convection” setting for baking. Be aware as the cake bakes and browns faster in this setting. Here is a synopsis on ovens…

(6) Oven Thermometer
Most of today’s ovens have an inbuilt thermometer. Mine has a preheat setting and a beep-when-ready indication. If you do not have this function in your oven , you will need to preheat your oven at the required temperature for 10-15 minutes. Use your oven thermometer (you can leave it in there) to check the reading. Make sure it is at the right temperature before you start baking.
(7) Baking pans
There are innumerable baking pans in the market today. Test try and see which best suit your baking needs and budget. Here are some of the pans which I use in baking…

How different is a cupcake from a muffin? Cupcakes are light, airy and sweet miniature cakes that have finer crumbs and always topped with frosting making it a delicious dessert item. The batter used is thin and smooth. “liners” specific for cupcakes are used here. Muffins are denser with a tough overflowing crust and heavier crumb. It can be sweet or savory and a good breakfast accompaniment. The batter used here sometimes incorporates whole wheat flour (high gluten) making it thick and lumpy. It is not a must to use liners for muffin baking… I grease and direct-use my pans.
Here are some of the cupcake/muffin pans that I use – regular cupcake pans, mini cup cake pans and jumbo cupcake pans. Another convenient option is to use reusable silicon baking cups-place them direct onto a baking sheet in the oven.

Other cake pans that I use…

Did you know? You could use mason jars to bake cakes !!

When I say it is going to be a new learning experience…I MEAN IT !! Yes, soon after you understand the basics I will guide you step-by-step to make these goodies.
(8) Oven safe accessories- Mitts, pot holder and kitchen towel

Mitts, I like using the ones with a “mouth” , makes it easier to carry pans. Pot holders are used for extra support to move deep pans …Kitchen towel I recommend using a separate one just for baking, to maintain hygiene in your work environment.
(9) Cooling racks

The process of cooling a cake is as important as baking one.The elevated grid allows airflow underneath the pan and helps with even cooling. After the cake is checked for doneness remove the pan and place on a rack for 15 minutes. Then invert the pan separating the cake from it and continue cooling for another 15-30 minutes (varies based on the cake size) until cool. Do not leave your cake out longer as it causes dryness… Once cool to the touch either store or level and ice as needed (picture guided tutorials coming up)
(10) Cake leveler

It is important to level a cake. A straight and leveled cake makes icing it a lot easier, which in turn results in a neat presentation. It is also important to have your cake layers leveled if you want to stack them. You can either use a serrated knife (knife with a rough edge like a bread knife) to level your cake or use a cake leveler like the Wilton one showed above. It comes with a handle, serrated wire and an adjustable “height” knob. The ease of use makes it ideal for beginners. The cake lifter/separator helps to separate the torted layers without breaking them. In addition, I find it very helpful in lifting and moving around my iced/fondant cakes
(11) Cake Boards

Cake boards (not to be confused with cake drums) come in different sizes… Above are 6 inches, 8 inches, and 10 inches. The cake board needs to match with the size of your cake layer. You can either buy or make your own using a sturdy cardboard material with your cake pan for shape/size guide. Cake boards help with icing and/or stacking your tiered cake which will be explained in detail later (topic- cake art!)
(12)Foil, Clingfilm and Parchment paper

Parchment paper can be used to line cake pans (instead of greasing and flouring)- this prevents the cake from sticking to your pan. The foil and cling film are used to wrap and store cake for later use. A detailed picture guided tutorial on “how to store cakes” is coming up soon.
(13) Nut Chopper

To those that wonder where the lid is …my daughter broke it moment before I clicked this picture !! I find this nut chopper useful when I bake nut based bread/muffins/cakes. Comes with a handle attachment and cup measurement guide.
(14) Carriers
These come in handy when you need to transport your goodies ! Here are the two carriers I use…

My personal favorite is the dual carrier by prepworks. It comes with a cake base and an additional cupcake insert that allows me to carry 24 cupcakes in two rows which I find very useful. The little “groove inserts” ensure the iced cupcakes don’t move around. It is collapsible which makes it ideal for storage. The cupcake carrier shown in the picture has a baking pan attached to it. So you can bake/cover & store/transport easily.
I hope this article covers most of your baking equipment/utensils related question. Feel free to post your comments (your feedback is valued !) and remember to share 🙂
Best
Thula

Neeru Tiwari
June 20, 2016
Very useful tips
Radhika
June 21, 2016
Hi Thula
These are such useful information for beginners … You make it look so easy ….
Great job putting it together !!!
Thulashitha RD
June 24, 2016
Thank you Radhika !
Ahallya
August 28, 2016
Very useful information with picture guidance Thula. It’s going to be very helpful and indeed different experience for starters.
Thulashitha RD
August 30, 2016
I’m glad you find it resourceful Ahallya 🙂 🙂 thanks for your feedback !
Gitanjali Kaul
June 20, 2016
Hi,
these are really very helpful.
I am a home baker and also hold classes for beginners in both baking and cake decorating and I’m going to recommend your page to my students for reference!
keep up the good work …will look forward to more such tips!
Thulashitha RD
June 20, 2016
Hello Gitanjali, thank you for the recommendation. Stay tuned !
Cynthia
June 20, 2016
Thanks for your useful articles.
Thulashitha RD
June 21, 2016
Anytime Cynthia !
Shirley
June 20, 2016
Hi,thank you for your useful articles.Clears many of our doubts and feel little confident while baking.Pl help us to become more confident with baking .Looking forward to learn received frm you.
Thulashitha RD
June 21, 2016
Shirley thanks for your interest ! when I say it is going to be a new learning experience I mean it!:) I will guide you step by step after the foundation is understood. feel free to post questions along the way… best, Thula
Samina
June 20, 2016
Can you recommend a good oven to buy! I have been using Indesit gas oven which came with my cooking range.
Thulashitha RD
June 21, 2016
Hi Samina, where do you live? Hope you got a chance to read the synopsis on ovens… you will need to make a decision based on your requirements and budget. thanks !
Indika
June 24, 2016
Very informative! Looking forward to the next post!
Thulashitha RD
June 24, 2016
Thank you Indika !
Bambina Chinnamma
July 9, 2016
It was really nice reading the post. Though I have been baking for my family and freinds for more than two decades youŕ tips helped.Thank You.
Thulashitha RD
July 14, 2016
You are more welcome. appreciate your feedback !
Jayanthy
July 27, 2016
This is amazing info for people like me who is interested in learning the basics! Great job! Looking forward to new posts!
Thulashitha RD
July 27, 2016
Glad you are enjoying the new learning experience 🙂 stay tuned Jayanthy!
Chetna
August 8, 2016
Hi Thula great job. I always want to master the skills of baking& cake decorating. After reading your article I found it easy & convenient. Thanks for putting this all together at one place.
Thulashitha RD
August 12, 2016
Hello Chetna, thanks for your feedback… i am glad that you find this blog site useful 🙂 stay tuned to future recipes and tutorials ! Best, Thula
Mythili
August 28, 2016
Big fan! Thank you. You are awesome 🙂
Thulashitha RD
August 30, 2016
Anytime Mythili 🙂
Ankita Srivastava
November 13, 2016
Thank you so much. Kudos to you for compiling all these. It’s really helpful. Appreciate it!
Thulashitha RD
November 17, 2016
Anytime Ankita ! 🙂
Natalie Dashem
March 21, 2020
It would be cool if you can make a video about this on YouTube…